[Spring] Spring REST Docs 도입기
Spring REST Docs 도입
프로젝트를 수행하던 중, 개발 중에 기획이 여러 번 바뀌고 이에 따라 오고 가는 자원의 형태도 달라져 API 문서를 수정하는 일이 자주 생겼다.
하지만 잘못하여 실수로 적는 일도 생기고, 매번 API가 변경될 때마다 문서까지 수정하여 전달하기엔 시간 소모가 많았다. 때문에 Spring REST Docs를 통해 컨트롤러 테스트와 동시에 문서 작성을 자동화시켜 바로 전달할 수 있는 환경을 갖출 수 있어 도입하게 되었다.
현재 Spring REST Docs는 Java 17이상, Spring Framework 6 이상의 환경을 요구한다.

build 구성
Spring REST Docs를 사용하기 위해 다음과 같이 빌드를 작성한다. (Gradle 환경)
plugins {
	id "org.asciidoctor.jvm.convert" version "3.3.2" // Asciidoctor 플러그인 추가
}

configurations {
	asciidoctorExt // asciidoctor 확장 종속성 설정
}

dependencies {
	asciidoctorExt 'org.springframework.restdocs:spring-restdocs-asciidoctor:{project-version}'
	testImplementation 'org.springframework.restdocs:spring-restdocs-mockmvc:{project-version}'
}

ext {
	snippetsDir = file('build/generated-snippets') // 생성된 snippets를 저장할 디렉터리
}

test {
	outputs.dir snippetsDir // snippets 저장을 수행하는 test task 설정
}

asciidoctor { // asciidoctor task 설정
	inputs.dir snippetsDir //
	configurations 'asciidoctorExt' // asciidoctor 확장 구성
	dependsOn test // test 이후 실행되도록 설정
}
여기서 jar파일과 resources에 html 문서를 넣고 싶다면 다음과 같이 추가할 수 있다.
asciidoctor {
	inputs.dir snippetsDir
	dependsOn test
	configurations 'asciidoctorExt'

	delete file('src/main/resources/static/docs') // 기존에 있던 문서 삭제
}

bootJar { // jar의 static/docs에 문서 복사
	dependsOn asciidoctor
	from ("${asciidoctor.outputDir}/html5") {
		into 'BOOT-INF/classes/static/docs'
	}
}

tasks.register('copyDocument', Copy) { // build/docs 문서를 resources에 복사
	dependsOn asciidoctor

	from file("build/docs/asciidoc")
	into file("src/main/resources/static/docs")
}

build {
	dependsOn copyDocument
}
Test Library
REST Docs를 테스트 코드에 적용하기 위해 다음과 같이 여러가지 방법을 사용할 수 있다.
- MockMvc
- WebTestClient
- REST Assured
WebTestClient는 WebFlux를 통해 non-blocking 방식으로 구성했을 때 사용한다.
이에 대해 자세한 내용을 보고 싶다면 다음 문서를 참고하자. [Spring REST Docs Document]
Spring REST Docs
Document RESTful services by combining hand-written documentation with auto-generated snippets produced with Spring MVC Test or WebTestClient.
docs.spring.io
일반적인 MVC 웹 애플리케이션에선 MockMvc와 REST Assured 중에 선택할 수 있다.
MockMvc는 다음과 같은 형태로 작성한다.
this.mockMvc.perform(get("/").accept(MediaType.APPLICATION_JSON))
		.andExpect(status().isOk())
		.andDo(document("index"));
REST Assured는 다음과 같이 BDD 스타일 형식의 코드를 작성할 수 있다.
RestAssured.given(this.spec)
		.accept("application/json")
		.filter(document("index"))
		.when().get("/")
		.then().assertThat().statusCode(is(200));
하지만 REST Assured는 @SpringBootTest로 수행하여 전체 Context를 가져와 빈을 주입하기 때문에 속도가 느리다. 때문에 @WebMvcTest를 통해 Controller만 테스트할 수 있는 MockMvc을 통한 방식이 단위 테스트 및 문서 작성에 더 적용하기 좋다 생각하여 MockMvc를 적용하였다.
Test Code
ApiDocumentUtils.java
public interface ApiDocumentUtils {

    static OperationRequestPreprocessor getDocumentRequest() {
        return preprocessRequest(prettyPrint());
    }

    static OperationResponsePreprocessor getDocumentResponse() {
        return preprocessResponse(prettyPrint());
    }
}
request와 response를 문서에 좀 더 이쁘게 출력하기 위해 사용한다.
RestDocsConfiguration.java
@TestConfiguration
public class RestDocsConfiguration {

    @Bean
    public RestDocsMockMvcConfigurationCustomizer restDocsMockMvcConfigurationCustomizer() {
        return configurer ->
                configurer
                        .operationPreprocessors()
                        .withRequestDefaults(prettyPrint())
                        .withResponseDefaults(prettyPrint());
    }
}
request와 response를 문서에 좀 더 이쁘게 출력하기 위해 사용한다. (다만 본 내용에서는 테스트 별로 document를 각각 따로 작성해주었기 때문에 적용이 되지 않는다)
RestDocsTest.java
@ExtendWith({RestDocumentationExtension.class, SpringExtension.class})
@Import(RestDocsConfiguration.class) // (1)
@AutoConfigureRestDocs // (2)
@WebMvcTest
public abstract class RestDocsTest {

    @Autowired
    private ObjectMapper objectMapper;
    protected MockMvc mockMvc;

    @MockBean
    private JwtAuthenticationFilter jwtAuthenticationFilter;

    protected String toJson(Object value) throws JsonProcessingException { // (3)
        return objectMapper.writeValueAsString(value);
    }

    @BeforeEach
    public void setMockMvc(WebApplicationContext context, RestDocumentationContextProvider provider) {
        mockMvc = MockMvcBuilders.webAppContextSetup(context)
                .apply(documentationConfiguration(provider)
                                .uris() // (4)
                                .withScheme("http")
                                .withHost("localhost")
                                .withPort(8080))
                .apply(springSecurity(new MockSecurityFilter())) // (5)
                .addFilter(new CharacterEncodingFilter("UTF-8", true))
                .alwaysDo(print())
                .alwaysDo(document("api/v1")) // (6)
                .build();
    }
}
문서를 꾸미기 위한 설정들이다.
(1) 위에서 구성한 RestDocsConfiguration을 Import 한다.
(2) 문서상 구성 및 설정을 지정해주는 어노테이션으로 다음 우선순위에 따라 적용된다.
- @AutoConfigureRestDocs 에 uri 정보가 선언되어있으면 적용
- getDocumentRequest 에 uri 정보가 설정되어있으면 적용
- 기본 설정 값 적용
(3) 생성한 객체를 json 형태로 변환하기 위한 메서드를 정의하였다.
(4) uri을 http://localhost:8080으로 지정하였다.
(5) spring security로 인해 테스트 수행 시 필터링을 통과시키기 위해 Mock 필터를 적용했다.
(6) 문서가 저장되는 기본 경로를 지정했다. (여기선 각 테스트 별로 재지정하여 적용되지 않았다)
MockSecurityFilter.java
public class MockSecurityFilter implements Filter {
    @Override
    public void init(FilterConfig filterConfig) { }

    @Override
    public void doFilter(ServletRequest request, ServletResponse response, FilterChain chain) throws IOException, ServletException {
        SecurityContext context = SecurityContextHolder.getContext();

        LoginUser loginUser = new LoginUser(createMember(), null, null); // (1)
        context.setAuthentication(new UsernamePasswordAuthenticationToken(loginUser, loginUser.getPassword(), loginUser.getAuthorities()));

        chain.doFilter(request, response);
    }

    private static Member createMember() {
        Member member = new Member("nickname", new Oauth2(AuthProvider.KAKAO, "account"));
        Class<Member> memberClass = Member.class;
        try {
            Field id = memberClass.getDeclaredField("id");
            id.setAccessible(true);
            id.set(member, 1L);
        } catch (NoSuchFieldException | IllegalAccessException e) {
            throw new RuntimeException(e);
        }
        return member;
    }

    @Override
    public void destroy() {
        SecurityContextHolder.clearContext();
    }

    public void getFilters(MockHttpServletRequest mockHttpServletRequest) { // (2)

    }
}
(1) Mock Member 객체를 만들어 Context에 등록하고 필터링을 통과시키도록 했다.
(2) Filter에서 getFilters 메서드를 못찾아 에러가 발생하는 현상을 해결하기 위해 작성하였다.
StickerControllerTest.java
@WebMvcTest(StickerController.class)
class StickerControllerTest extends RestDocsTest {

    @MockBean
    private StickerService stickerService;

    @Test
    @DisplayName("스티커 추가")
    void addSticker() throws Exception {
        Sticker expectedSticker = new Sticker("smile", 0.2, 1.5, new Member("", new Oauth2(AuthProvider.KAKAO, "")));
        given(stickerService.save(any(StickerAddRequest.class), any(Long.class))).willReturn(expectedSticker); // (1)

        ResultActions perform =
                mockMvc.perform(post("/api/v1/stickers")
                        .contentType(MediaType.APPLICATION_JSON)
                        .content(toJson(new StickerAddRequest("smile", 0.2, 1.5)))); // (2)

        perform.andExpect(status().isOk())
                .andExpect(jsonPath("$.category").value(expectedSticker.getCategory())); // (3)

        perform.andDo(print()) // (4)
                .andDo(document("add-sticker",
                        getDocumentRequest(),
                        getDocumentResponse(),
                        requestFields(
                                fieldWithPath("category").type(JsonFieldType.STRING).description("스티커 종류"),
                                fieldWithPath("xCoordinate").type(JsonFieldType.NUMBER).description("X 좌표"),
                                fieldWithPath("yCoordinate").type(JsonFieldType.NUMBER).description("Y 좌표")),
                        responseFields(
                                fieldWithPath("id").type(JsonFieldType.STRING).description("스티커 키").optional(),
                                fieldWithPath("category").type(JsonFieldType.STRING).description("스티커 종류"),
                                fieldWithPath("xCoordinate").type(JsonFieldType.NUMBER).description("X 좌표"),
                                fieldWithPath("yCoordinate").type(JsonFieldType.NUMBER).description("Y 좌표"))));
    }
}
(1) BDD 스타일을 통하여 테스트를 수행하고자 given 상황을 지정하여 stickerService에서 save메서드가 수행되면 기대하는 Sticker 객체가 반환되도록 하였다.
(2) StickerAddRequest를 body에 담아 /api/v1/stickers로 요청을 보내도록 지정하였다.
(3) 결과로 ok Status(200)과 response된 category가 기대한 category와 일치하는지 검증하였다.
(4) 문서에 출력되는 내용을 작성하였다.
작성 이후 테스트를 실행해봤더니 잘 돌아간다.

이제 테스트를 돌렸으면 터미널에서 다음 명령어를 입력하여 gradle을 통해 빌드해보자
./gradlew clean build위 명령을 실행하면 이전 빌드 내용을 지우고 새로 빌드한다.
이렇게 하면 build/generated-snippets/* 경로에 snippet들이 들어있을 것이다.
우린 이제 이 조각들을 가지고 문서를 작성하면 된다.
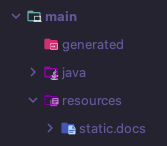
먼저 생성된 문서가 src/main/resources/static/docs 에 복사되도록 gradle에서 설정했기 때문에 이 경로를 찾을 수 있도록 다음과 같이 디렉터리를 만들어두자

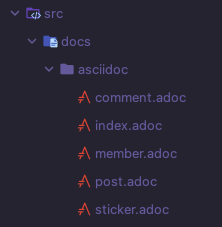
그리고 조각들을 모을 문서를 src/docs/asciidocs 경로에 작성한다

문서는 Asciidoc이라는 경량화된 마크다운 언어를 통해 작성할 수 있으며 .adoc 확장자를 가진다.
만약 Asciidoc 문법을 모른다면 다음을 참고하여 작성해보자 (문법은 상당히 쉽다)
Asciidoc - 나무위키
이 저작물은 CC BY-NC-SA 2.0 KR에 따라 이용할 수 있습니다. (단, 라이선스가 명시된 일부 문서 및 삽화 제외) 기여하신 문서의 저작권은 각 기여자에게 있으며, 각 기여자는 기여하신 부분의 저작권
namu.wiki
IntelliJ를 사용한다면 미리보기를 할 수 있는 플러그인도 지원되므로 잘 써먹어보자

이렇게 작성을 다 했다면 다시 gradle을 빌드해보자
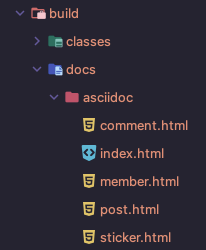
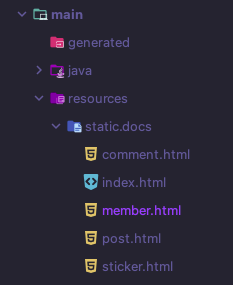
그럼 build/docs/asciidoc과 우리가 생성했던 src/resources/static/docs에 html 파일이 들어가 있을 것이다.


그러고 원하는 html 파일을 열어보면 문서가 이쁘게 잘 작성된 것을 볼 수 있다.

지금 작성한 것과 다르게 자유롭게 커스텀이 가능하니 문서 작성을 예쁘게 잘 해보도록 하자
'Backend > Spring' 카테고리의 다른 글
| [Spring] 서버 스펙에 따른 쓰레드 수 조정 (2) | 2025.08.11 |
|---|---|
| [Spring] 좋아요 기능에 대한 동시성 문제 (4) | 2025.08.03 |
댓글
이 글 공유하기
다른 글
-
[Spring] 서버 스펙에 따른 쓰레드 수 조정
[Spring] 서버 스펙에 따른 쓰레드 수 조정
2025.08.11 -
[Spring] 좋아요 기능에 대한 동시성 문제
[Spring] 좋아요 기능에 대한 동시성 문제
2025.08.03